Who doesn’t want a guilt free dessert? These vegan twix bites are exactly that! So easy to make and the perfect dessert to satisfy any craving. Plus, they are gluten free and vegan so it’s a win win!

Why Make These Tasty Vegan Twix Treats?
If you’re craving a quick dessert, this is the perfect thing to stash up on in your freezer! I love making a huge batch and then pop one or two in my mouth after a meal for a guilt free dessert. And the layers are absolutely perfect!
Guilt Free and Gluten Free Vegan Twix Bites
Who doesn't want a guilt free dessert? This vegan twix bites are exactly that! So easy to make and the perfect dessert to satisfy any graving. Plus, they are gluten free and vegan so it's a win win!
Servings: 40 Bites
Ingredients
Shortbread Layer
- ¾ cup Coconut Flour
- ¾ cup Almond Flour
- ⅓ cup Coconut Oil, melted
- ⅓ cup Maple Syrup, warmed
Caramel Layer
- 1 cup Creamy Almond Butter
- ⅓ cup Maple Syrup
- ¼ cup Coconut Oil
- 2 tsp Vanilla Extract
Chocolate Layer
- 3 bars of Vegan Dark Chocolate
- ½ tbsp Coconut Oil
Instructions
Shortbread Layer
- Preheat oven to 350*
- Mix all ingredients together in a large bowl.
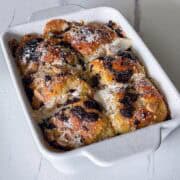
- Line a bread pan with parchment paper and pack down mixture into base.
- Bake for 8-10 minutes or until golden brown.
- Remove once done and place in fridge for 10-15 minutes to cool while you prep the caramel layer.
Caramel Layer
- Mix all the ingredients together in a small saucepan over the stove on low to medium heat and cook until liquid (~2-3 minutes).
- Remove from burner and add to your shortbread layer.
- Place in freezer for at least 2-3 hours.
Chocolate Layer
- Prep your chocolate layer once the rest has set in the freezer.
- Break you chocolate bar into pieces and add to a microwave safe bowl.
- Add the coconut oil on top.
- Then microwave together in 30 second intervals, mixing with a spoon in between.
- You should only have to do it twice until all the chocolate has melted.
Final Prep
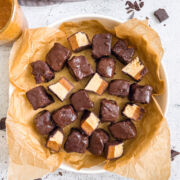
- Remove the set shortbread and caramel layers from the baking sheet and cut into little bites. I cut mine into 4 columns and 3 rows to make a total of 40 bites.
- Place a cooling rack such as this over a large baking sheet to create a drip system.
- Then dunk each twix bite into the melted chocolate using 2 forks, coat completly, and then place on the rack. Excess chocolate will drip down into the baking sheet.
- Continue until you have coated them all.
- Place the baking sheet in the freezer then for everything to set. Minimum of 15 minutes.
- Remove from the fridge and transfer to a glass storage container.
- Grab and a bite and enjoy!
The Nutrition Facts above are specific to the ingredients I chose to use for this recipe.
Extra Notes & Tips
- For the shortbread layer, keep an eye on it because you want to ensure the top doesn’t burn. I use my Ninja Foodi Toaster Oven to bake so it cooks a lot faster.
- Make sure to use unrefined, cooking coconut oil for the best flavor.
- When dunking your Twix bites, be sure to move fast. I made this in the hot Texas summer so they started to melt pretty quickly so I did it in batches of two.
- Store your Twix bites in the freezer for the best crunchy bite and perfect consistency!
Suggested Equipment


Save this recipe to your Pinterest Board and share it with your family and friends!

DID YOU MAKE THIS RECIPE?
Be sure to tag @tishasveggieeats on Instagram and hashtag #tishasveggieeats!


Janvi says
These twix bites are SO GOOD! Highly highly recommend making them! They even taste great without the chocolate – the shortbread and caramel layer are delicious – but of course chocolate makes everything better haha! Fair warning: they are very addicting!
Ritisha says
Chocolate definitely does make everything better! I’m so glad you enjoyed them! I definitely need to make a new batch.