
Buttermilk Biscuits Like No Other!
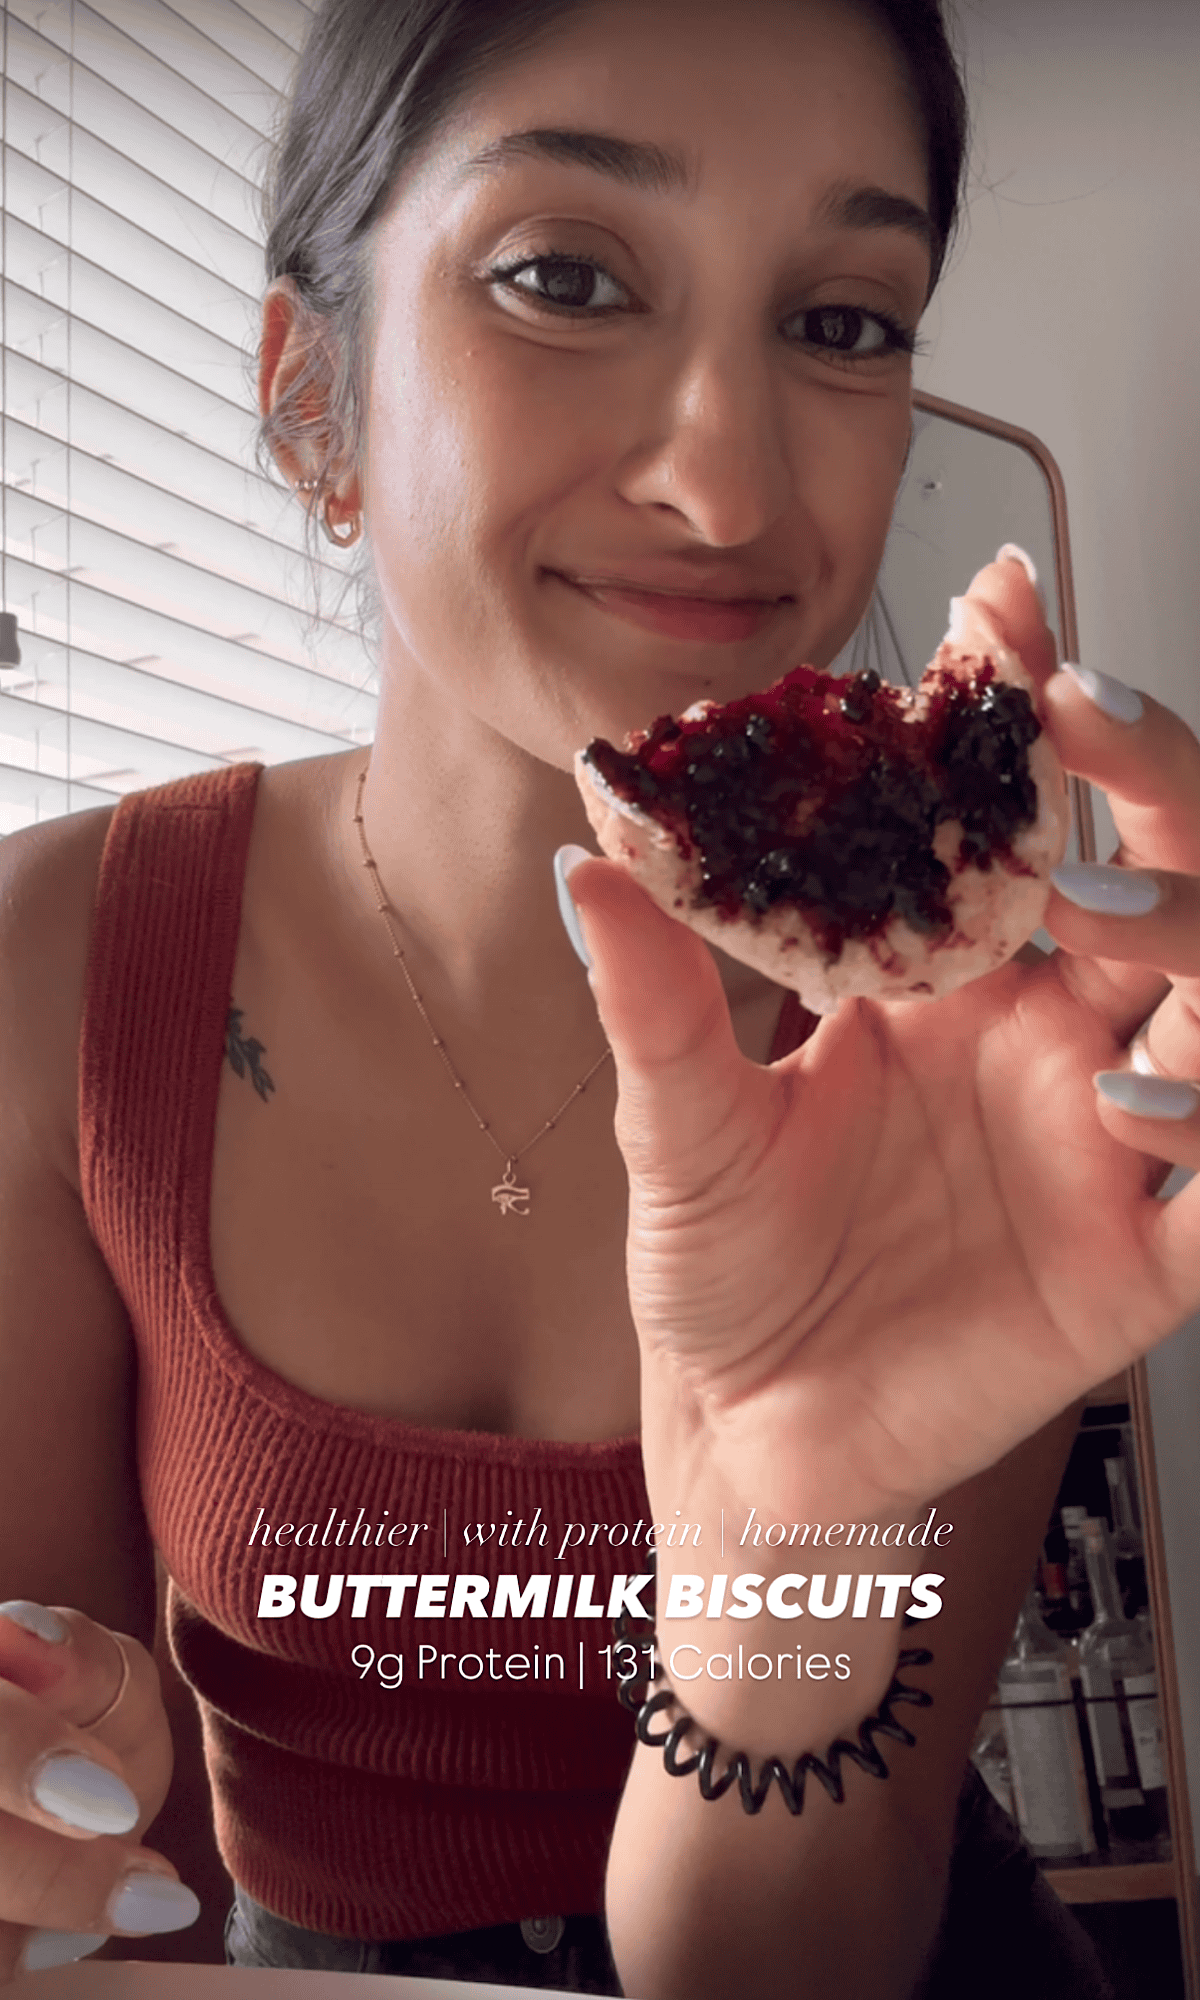
Brace yourselves for the ultimate buttermilk biscuits that redefine homemade comfort! These soft, buttery, fluffy delights are not just your ordinary biscuits—they’re a high protein marvel, making them the perfect healthy indulgence. Imagine sinking your teeth into one of these easy homemade buttermilk biscuits, fresh out of the oven, with a golden, slightly crisp exterior giving way to an unbelievably soft and tender middle. Yes, it’s real, and it’s spectacular!

But wait, there’s more to these biscuits than just their scrumptious texture. These homemade biscuits are crafted to boost your protein intake while keeping the fat content low, all without compromising on that classic buttermilk biscuit flavor we all adore. Whether you’re layering them with velvety butter, your favorite jam, or transforming them into stunning strawberry shortcakes, these biscuits are a game-changer.
For those who think biscuits are just a side—think again. These high protein biscuits are a standout star, capable of elevating any meal, or even stealing the show all on their own. Plus, they’re unbelievably easy to whip up. Minimal prep time, basic ingredients, and you’re set to dazzle your friends, family, or just treat yourself. And why not? You deserve a batch of these heavenly buttermilk biscuits all to yourself—no sharing required (;
So, if you’re ready to upgrade your biscuit experience and enjoy a guilt-free, protein-packed treat, this recipe is for you. Dive into the world of high protein, low fat, easy buttermilk biscuits and let every bite remind you of how amazing homemade can truly be.
Macros Per Serving
131 Cal | 13g Carbs | 4.5g Fat | 9g Protein
- Macros Per Serving
- Why You’ll Love This Recipe
- Key Ingredients for this Homemade Buttermilk Biscuits
- Substitution Options
- Equipment and Tools
- How to Make Your Homemade Buttermilk Biscuits
- Tips and Tricks
- Storage Instructions
- More Buttermilk Biscuit Recipes
- FAQs
- Recipe Card
- Save this recipe to your Pinterest Board and share it with your family and friends!
- Macros Per Serving
- Why You’ll Love This Recipe
- Key Ingredients for this —
- Substitution Options
- Equipment and Tools
- How to Make Your —
- Tips and Tricks
- Storage Instructions
- More — Recipes
- FAQs
- Recipe Card
- Save this recipe to your Pinterest Board and share it with your family and friends!
- Macros Per Serving
- Why You’ll Love This Recipe
- Key Ingredients for this Homemade Buttermilk Biscuits
- Substitution Options
- Equipment and Tools
- How to Make Your Homemade Buttermilk Biscuits
- Tips and Tricks
- Storage Instructions
- Save this recipe to your Pinterest Board
- FAQs
- Recipe Card
- Save this recipe to your Pinterest Board and share it with your family and friends!
- Macros Per Serving
- Why You’ll Love This Recipe
- Key Ingredients for this —
- Substitution Options
- Equipment and Tools
- How to Make Your —
- Tips and Tricks
- Storage Instructions
- More — Recipes
- FAQs
- Recipe Card
- Save this recipe to your Pinterest Board
Why You’ll Love This Recipe
If you’ve been on the hunt for easy buttermilk biscuits that are both wholesome and indulgent, this recipe is your dream come true. These high protein biscuits are flaky, tender, and packed with buttery flavor—yet made with better-for-you ingredients that won’t weigh you down. Whether you’re serving them sweet or savory, these homemade biscuits are guaranteed to become a staple in your kitchen.
Fluffy, golden, and endlessly versatile, you can enjoy them fresh from the oven with jam, layered into a strawberry shortcake, or topped with a savory mushroom gravy. They’re easy to prep, ready in under 30 minutes, and perfect for breakfast, brunch, or a cozy side to your favorite dinner. Here’s why these buttermilk biscuits deserve a spot in your regular rotation:
- Flaky & Buttery Texture: Thanks to cold cubed butter and just the right amount of mixing, these easy buttermilk biscuits bake up with the perfect flaky layers and rich, buttery flavor.
- High Protein Twist: Made with a blend of protein powder, Greek yogurt, and keto wheat flour, these biscuits are lightened up without losing their signature taste and texture.
- Lower in Fat: You still get all the comfort of classic homemade biscuits, but with less fat—making them a smarter choice for everyday indulgence.
- Tangy Buttermilk Flavor: The addition of low-fat buttermilk brings a bright, slightly tangy finish that balances the richness beautifully.
- Quick and Easy: No complicated steps here. These come together with minimal prep and ingredients you likely already have on hand.
- Perfect for Any Occasion: Serve them as a side, enjoy them with your morning coffee, or dress them up for dessert—these high protein biscuits work any time of day.
Once you taste how flavorful and satisfying these macro-friendly buttermilk biscuits are, you’ll wonder why you didn’t start making them sooner. They’re the perfect balance of comfort and nutrition—no compromise required.
Key Ingredients for this Homemade Buttermilk Biscuits
These high protein buttermilk biscuits are soft, fluffy, and packed with flavor—all thanks to a thoughtful combination of nourishing ingredients. Each one plays a key role in achieving that perfect tender texture while keeping things macro-friendly and easy to make at home.
Here’s what you’ll need for the best homemade biscuits ever:
- All-Purpose Flour: The reliable base that helps build structure while keeping these biscuits light and fluffy.
- Keto Wheat Flour: Adds fiber and lowers carbs without compromising flavor or texture. You can sub equal parts all-purpose flour if preferred.
- Unflavored Protein Powder: The secret to turning these into high protein biscuits. It blends right in and adds extra staying power without altering taste.
- Baking Powder: Gives these buttermilk biscuits that beautiful rise and height.
- Baking Soda: Just a small amount, but it’s essential for activating the buttermilk and adding tenderness.
- Salt: Enhances flavor and balances out the tang from the buttermilk.
- Unsalted Butter: Cold and cubed, this is what creates those magical flaky layers in every bite.
- Nonfat Greek Yogurt: Adds extra protein and moisture while helping reduce overall fat content.
- Low Fat Buttermilk: Essential for that classic buttermilk biscuit flavor with less fat—plus it reacts with the leavening agents to lift the dough.
- Extra All-Purpose Flour (for kneading): Keeps the dough workable and prevents sticking as you fold and shape those perfect flaky layers.
Substitution Options
Don’t have everything on hand or looking to mix things up? No problem. These easy buttermilk biscuits are flexible and can be adapted to suit your dietary needs or pantry staples. Feel free to experiment while still keeping that flaky, buttery, high protein biscuit goodness intact.
Here are some helpful swaps you can try:
- Keto Wheat Flour: Swap with equal parts all-purpose flour if you don’t need the added fiber or lower carb content.
- Unflavored Protein Powder: If you’re out, try using plain collagen powder or simply omit and replace with a little extra flour—but note that protein content will drop.
- Nonfat Greek Yogurt: Substitute with plain low-fat Greek yogurt or even plant-based yogurt if you’re dairy-free.
- Low Fat Buttermilk: Can’t find any? Combine 1/2 cup of low-fat milk with 1/2 tablespoon of lemon juice or vinegar and let sit for 5-10 minutes.
- Unsalted Butter: If needed, use salted butter and slightly reduce the added salt in the recipe to balance.
Whether you’re customizing for dietary needs or just working with what you’ve got, these easy swaps will keep your biscuits delicious and satisfying.
**If there is a sub I haven’t mentioned above, it’s because I have not tested it and can’t speak for how well it would work for this recipe.
Equipment and Tools
No need for a fancy kitchen setup—these easy buttermilk biscuits come together with just a few tools you likely already have. With the right equipment, you’ll get that golden, flaky finish every time.
Here’s what you’ll need to get started:
- Mixing Bowl: A large mixing bowl is essential for combining all your dry and wet ingredients with room to work.
- Pastry Cutter or Hands: Either one works for pressing the cold butter into the flour mixture.
- Measuring Scale: Ideal for accurately measuring your flours and protein powder to get consistent, high-protein biscuits.
- Rolling Pin: Helps roll out your dough evenly so your biscuit layers bake up perfectly.
- Floured Surface: A clean countertop or cutting board floured with extra all-purpose flour for kneading and folding.
- Round Glass or Biscuit Cutter: Used to cut out your biscuit shapes cleanly.
- Cast Iron Skillet or Baking Sheet: Both are great options—cast iron gives a crisp bottom, while a baking sheet allows more spacing.
- Pastry Brush: To brush buttermilk over the tops before baking for that golden finish.
- Oven: Preheated to 400°F for even baking and golden tops.
How to Make Your Homemade Buttermilk Biscuits
These homemade buttermilk biscuits may look bakery-worthy, but they’re actually super simple to whip up. With just a few basic ingredients and a little folding magic, you’ll have warm, flaky biscuits on the table in under 30 minutes.
Follow this step-by-step guide to make your own batch of high protein biscuits:
Mix the Dry Ingredients
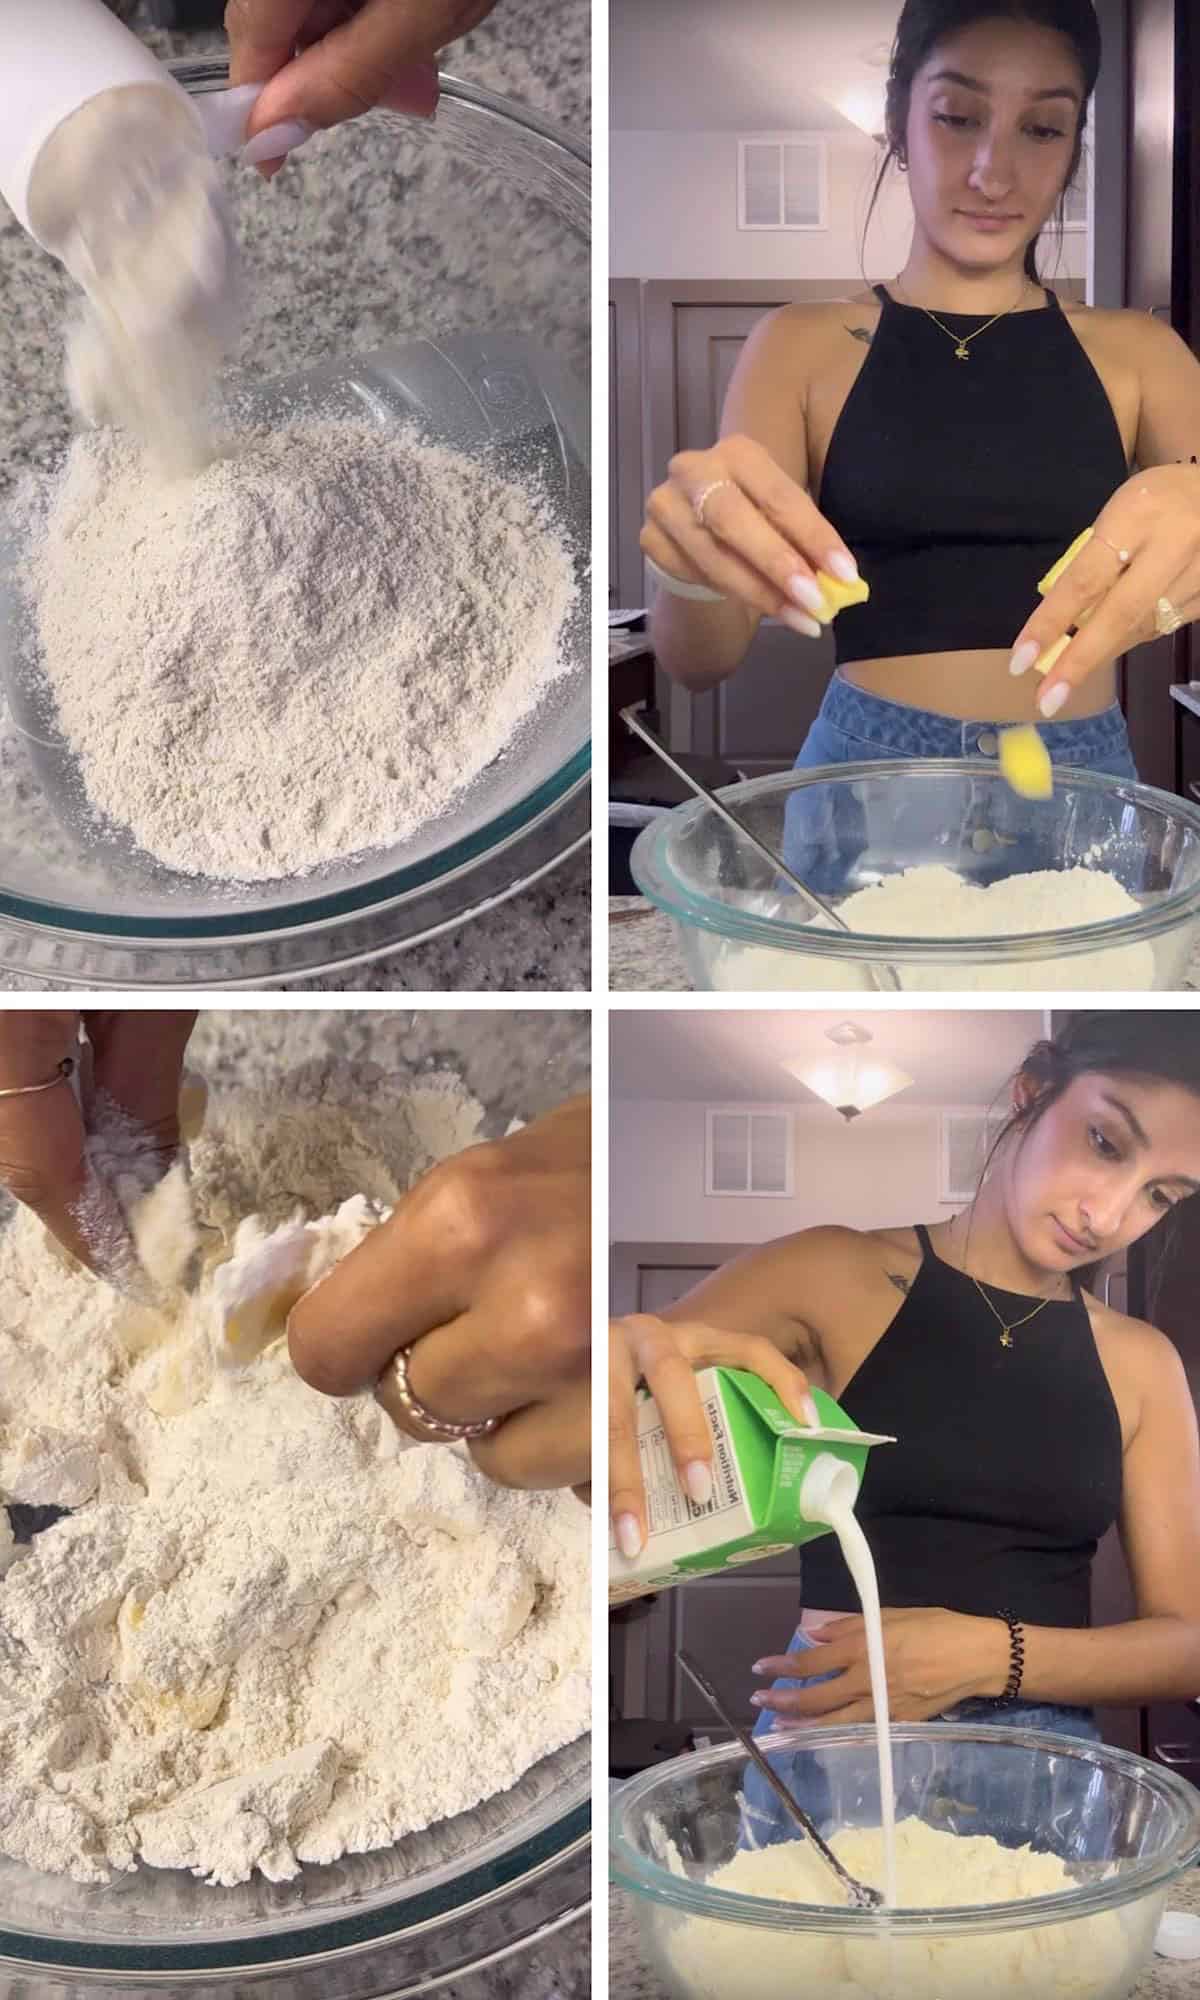
In a large bowl, combine your flours, protein powder, baking powder, baking soda, and salt. Give everything a good mix so it’s evenly incorporated.
Add the Butter
Drop in your cold, cubed butter and use your hands to press and crumble it into the flour mixture. You’re aiming for a crumbly texture with small butter pieces still visible.
Stir in Yogurt & Buttermilk
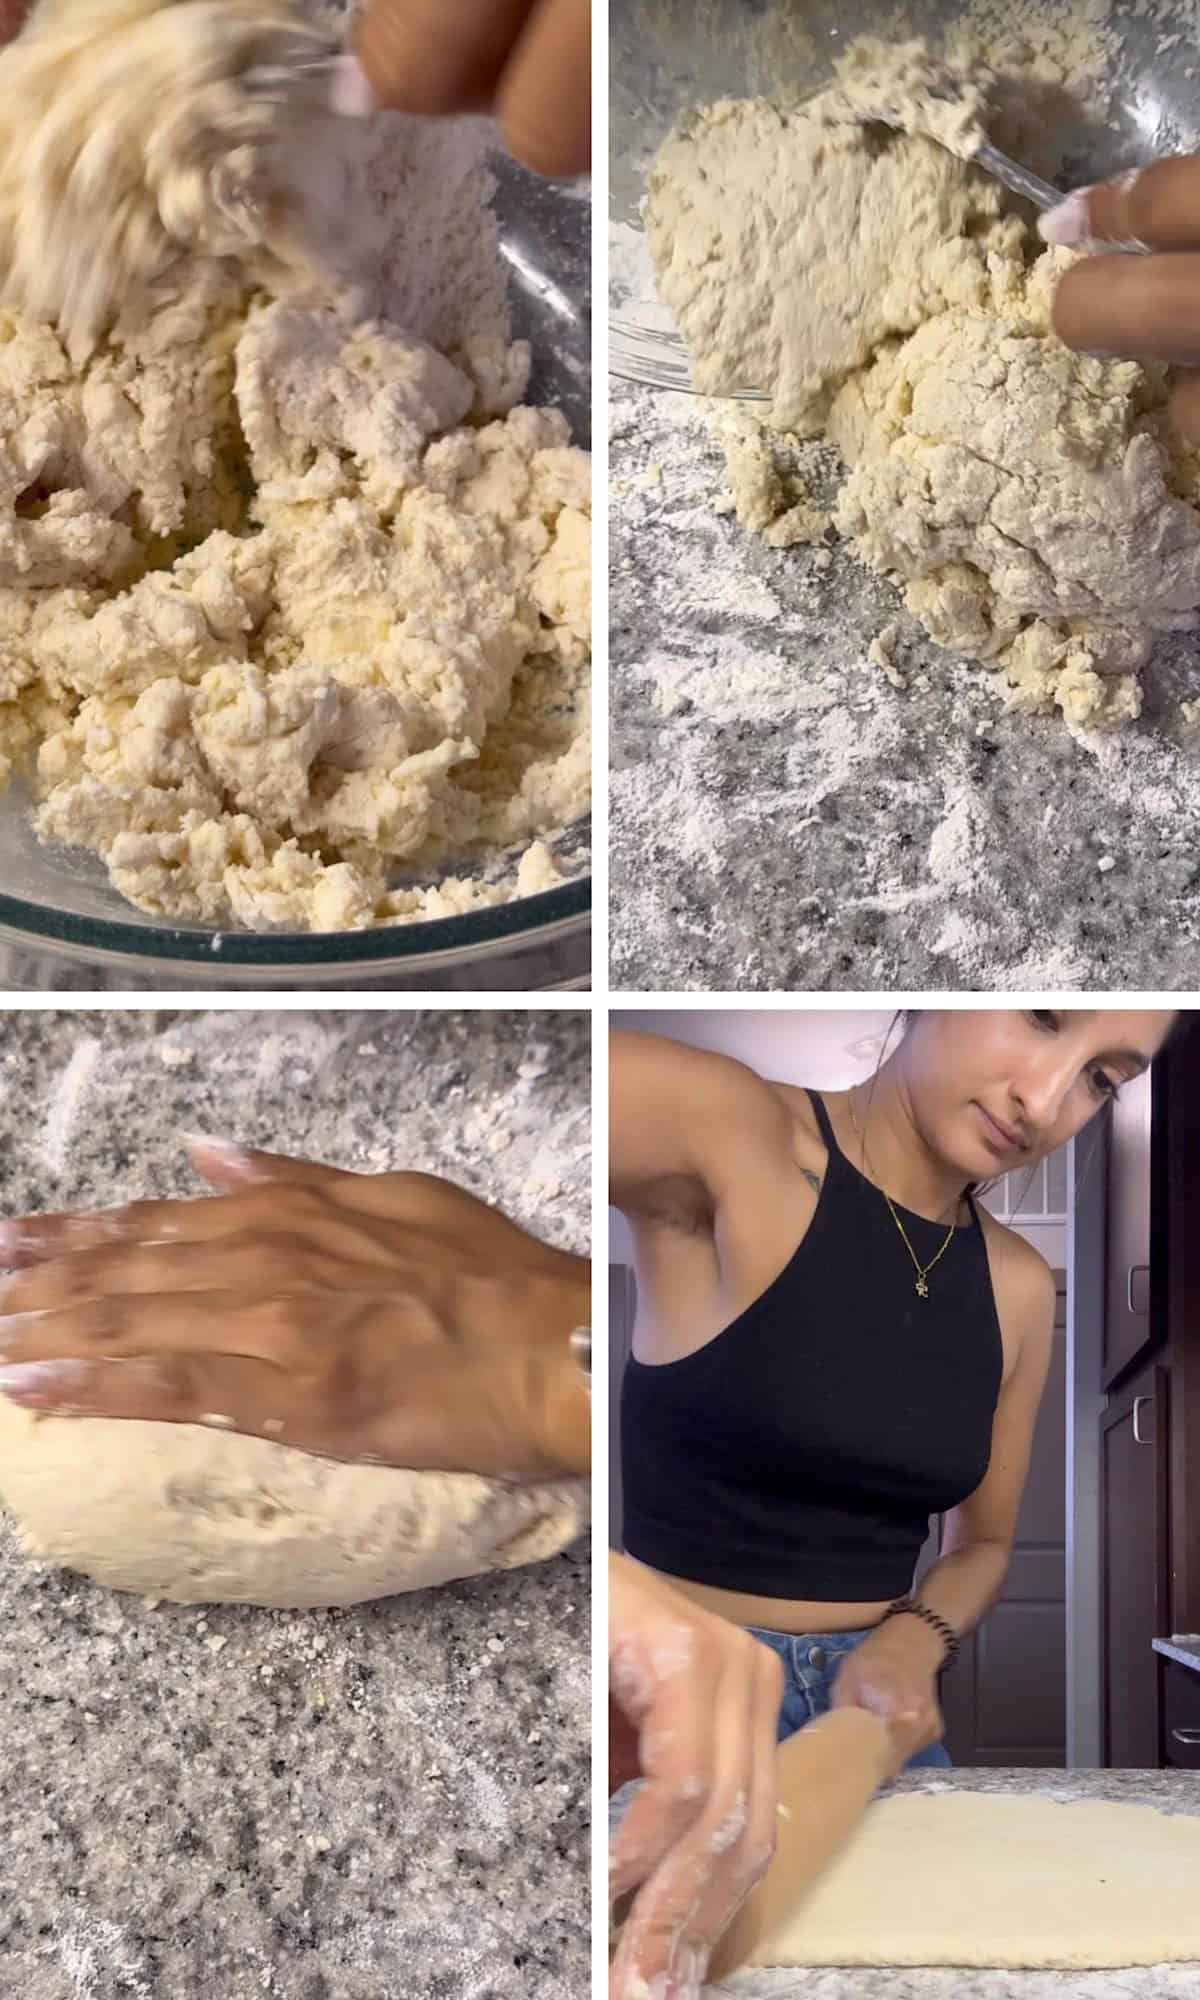
Add in the Greek yogurt and mix gently with a spoon. Then pour the buttermilk into the center and stir just a few times until a shaggy, crumbly dough forms. Don’t overmix here—less is more.
Knead the Dough
Lightly flour your surface using the extra flour and turn out the dough. Gently knead a few times just until it comes together. Keep flouring your hands and surface to prevent sticking.
Create Flaky Layers
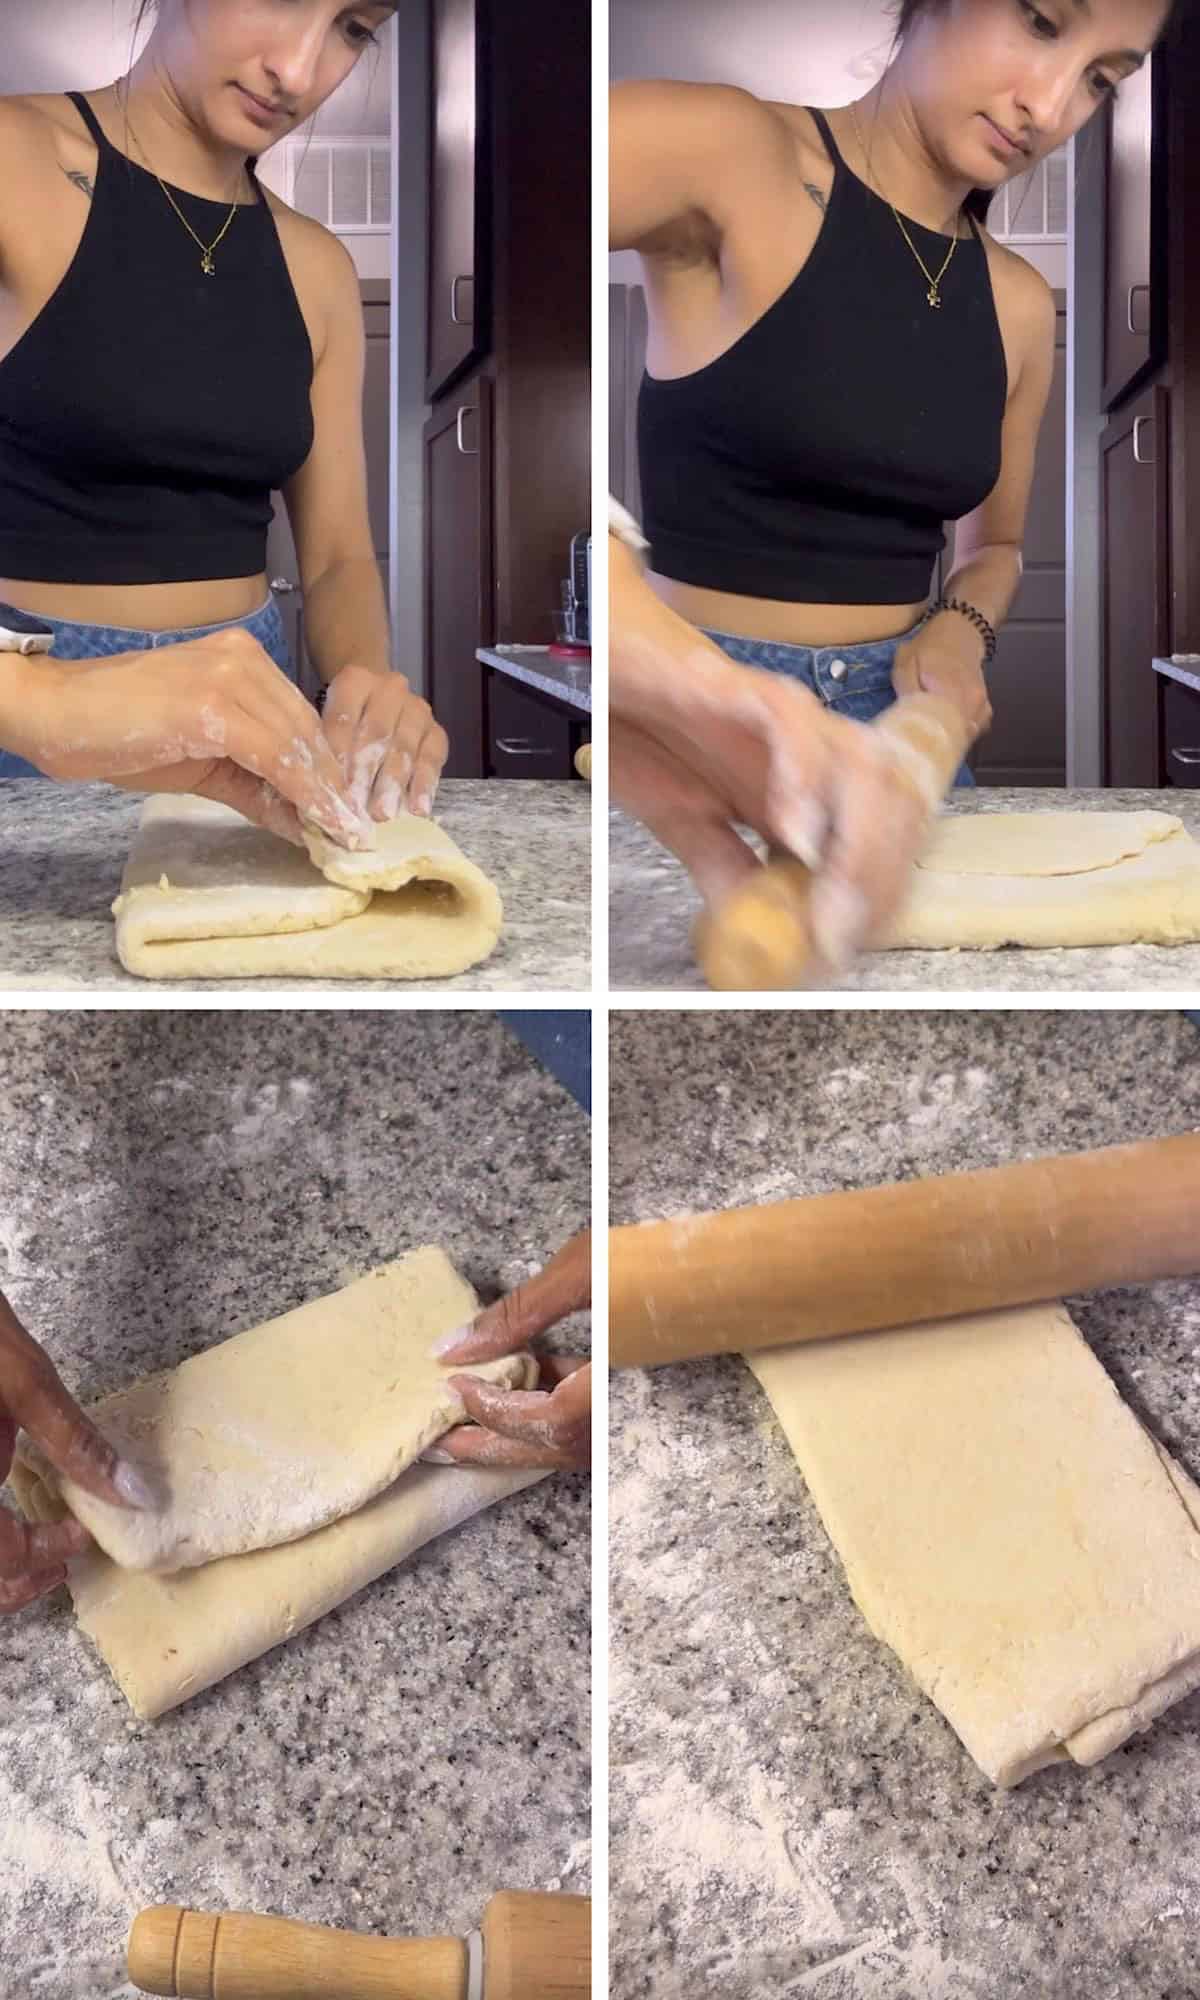
Roll the dough into a rectangle, fold one side over the middle, then the other side on top. Rotate and repeat the rolling and folding process two more times. This is how you get those buttery biscuit layers.
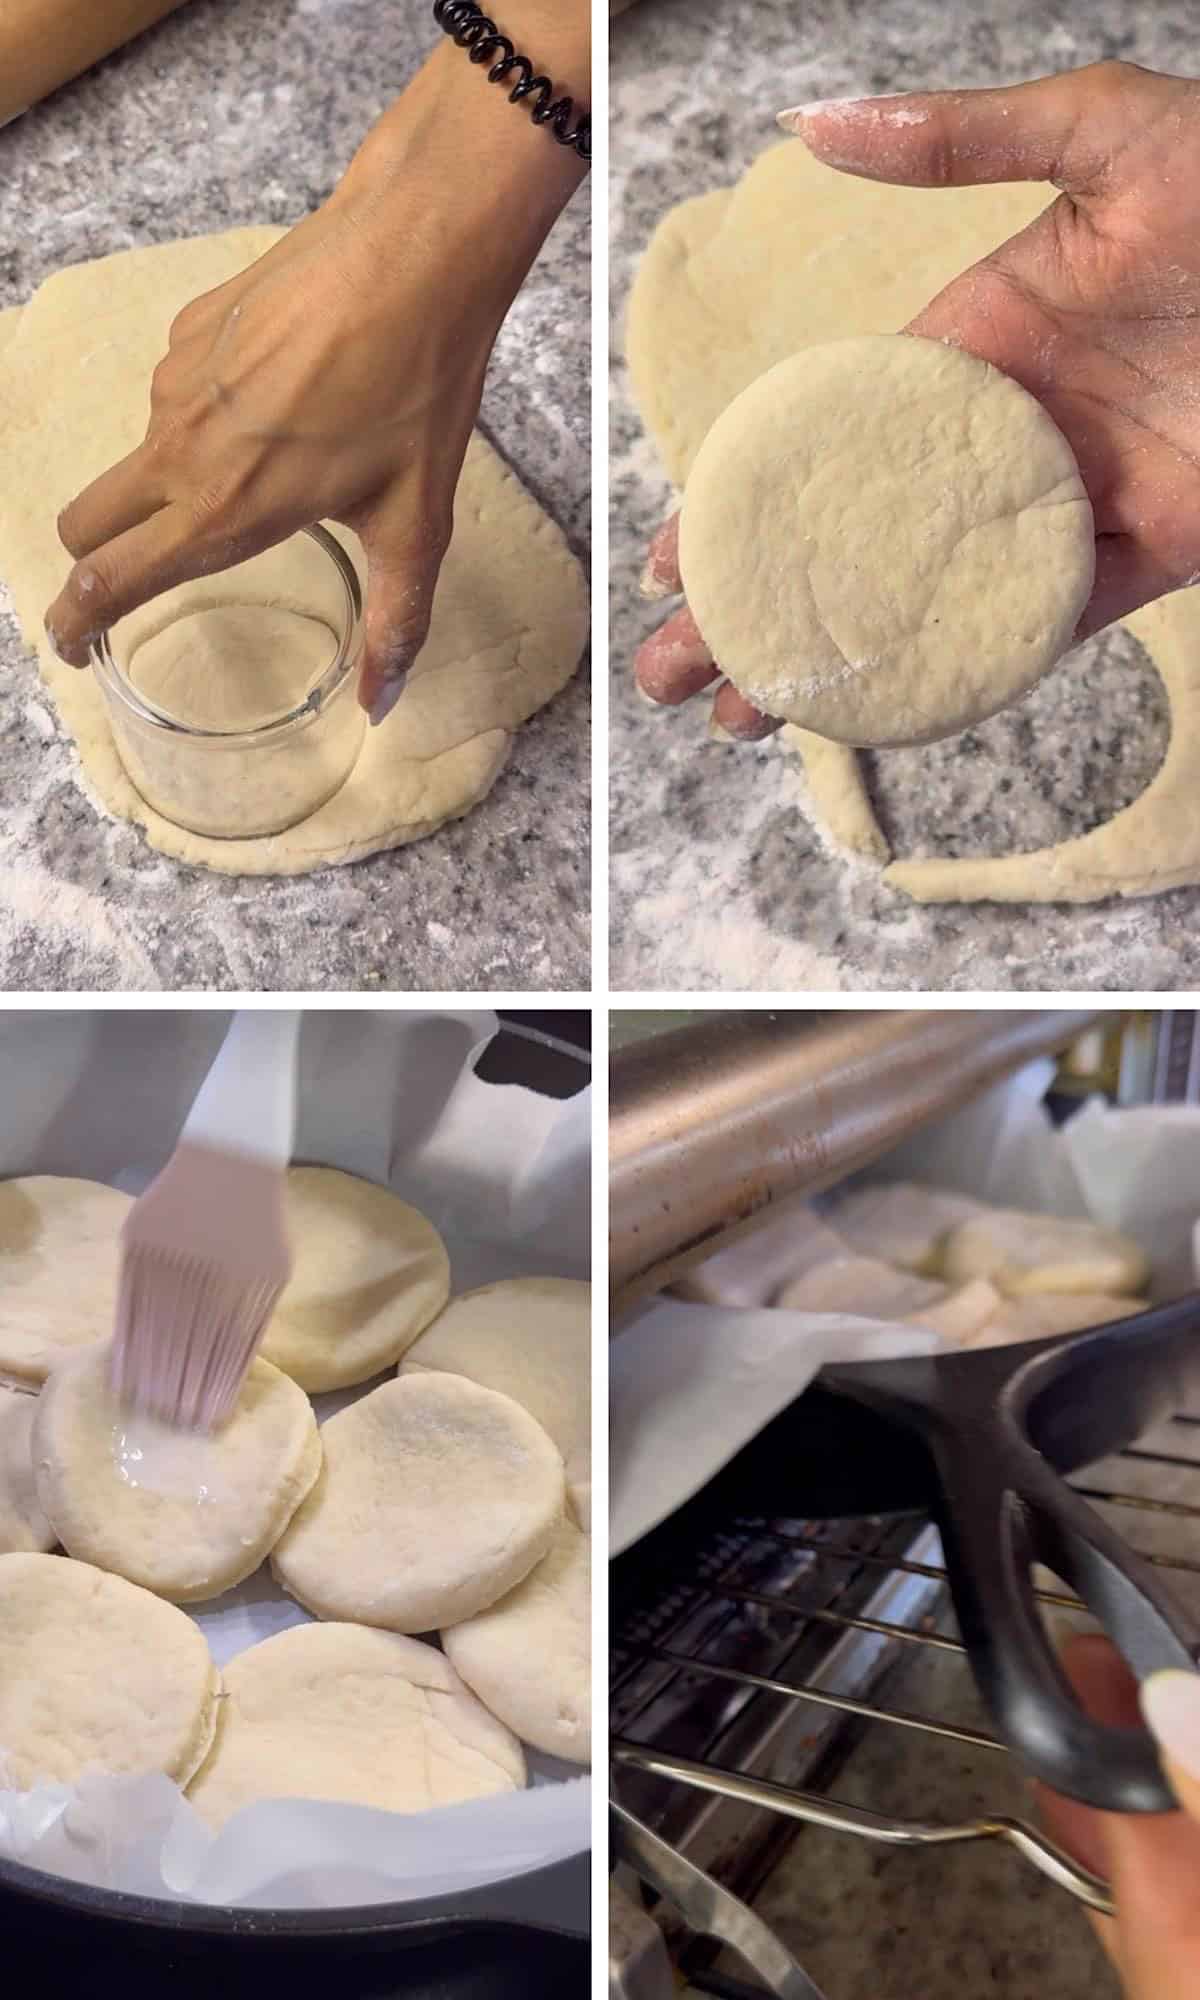
Cut and Bake
Roll the dough to about 1/2” to 3/4” thickness. Use a glass to cut out 8–9 rounds. Place on a cast iron skillet or baking sheet, brush with extra buttermilk, and bake at 400°F for 15–18 minutes until golden.
Cool & Serve
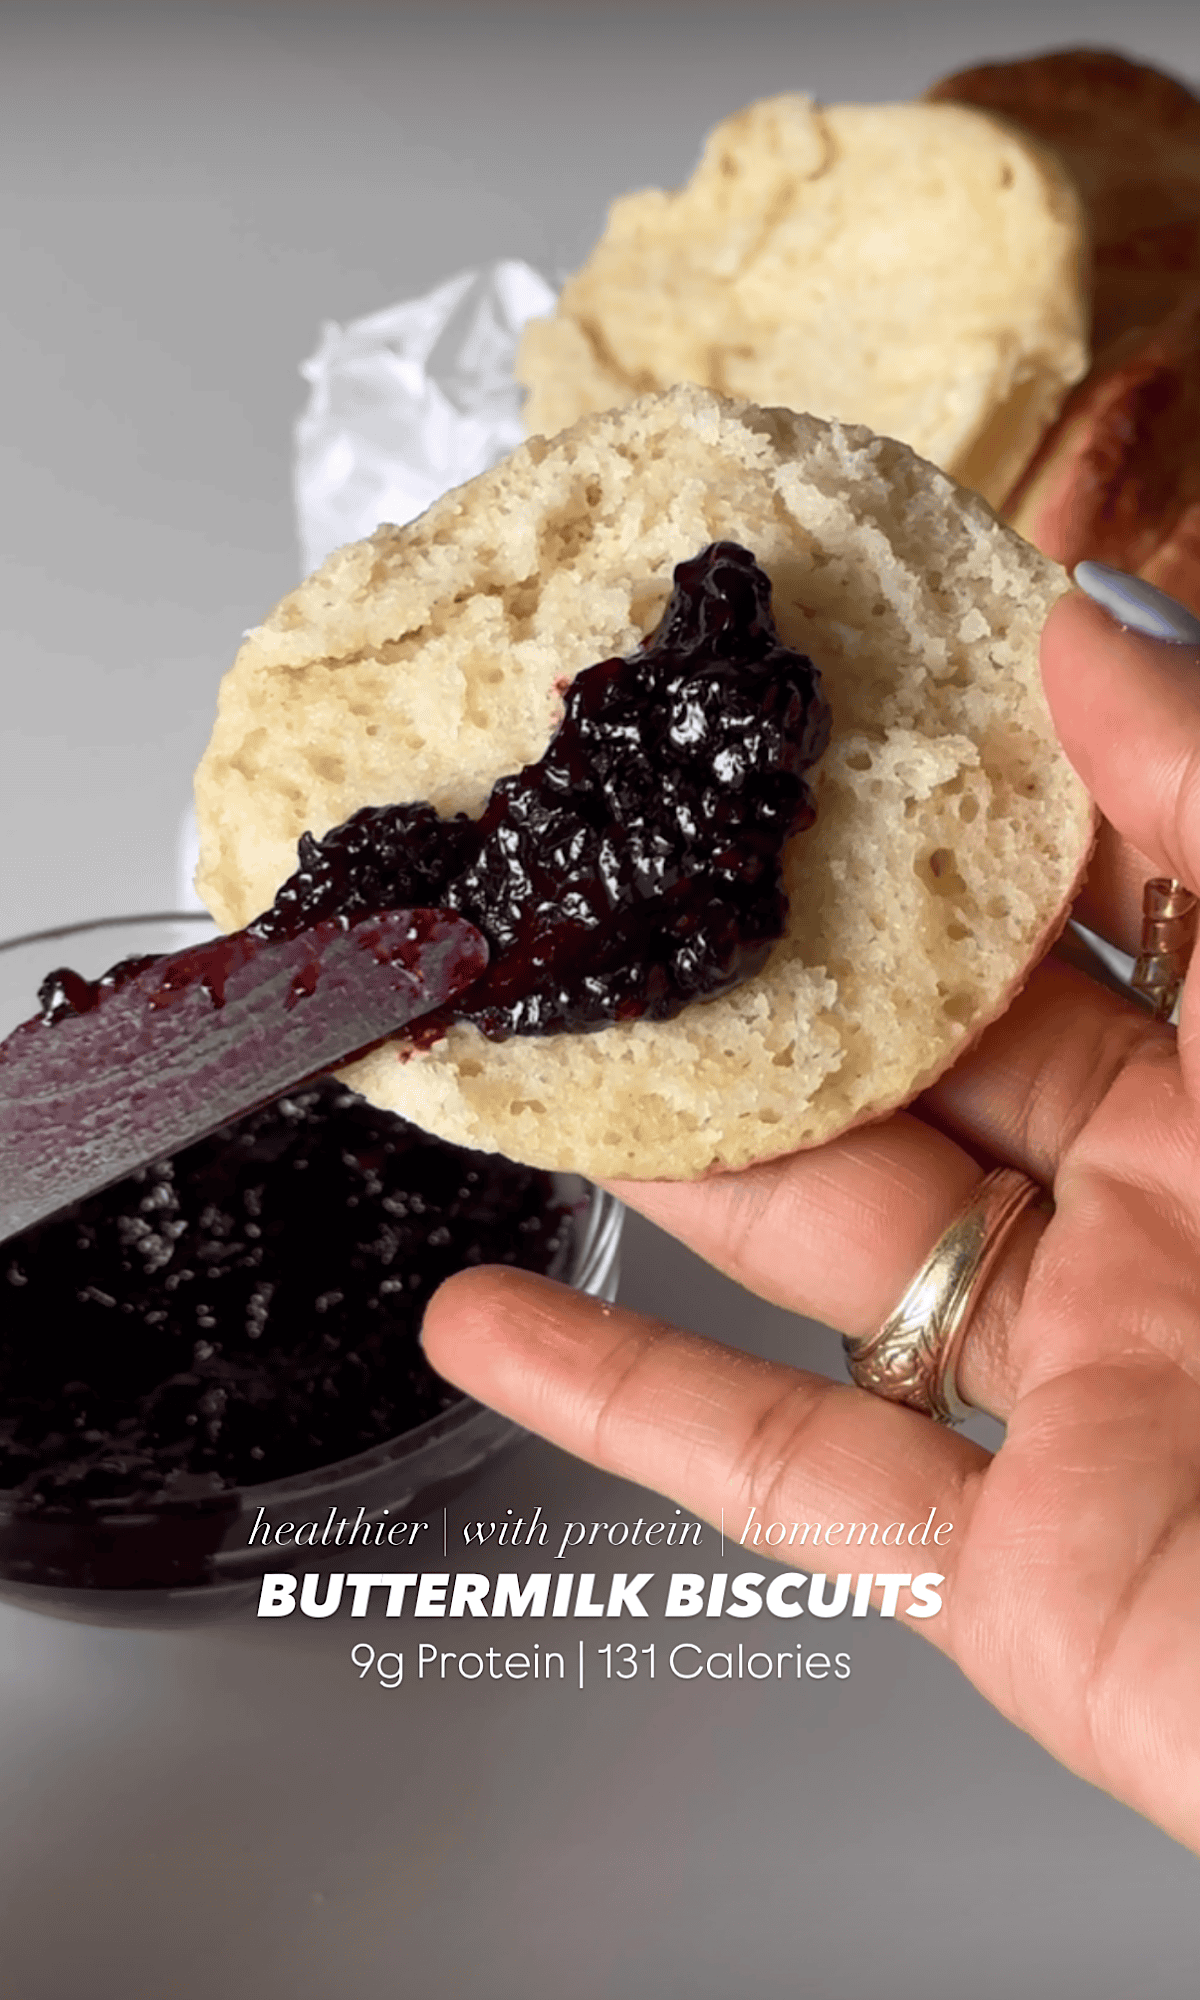
Let them cool for at least 10 minutes before slicing. Then enjoy your high protein buttermilk biscuits with jam, butter, or turn them into strawberry shortcakes!
These biscuits are soft, flaky, and so easy to love. Once you master the fold technique, you’ll be making them on repeat.
Tips and Tricks
Crafting the perfect batch of high protein buttermilk biscuits is both an art and a science. With a few expert tips, you can ensure your homemade biscuits turn out flaky, tender, and utterly delicious every time. Whether you’re a seasoned baker or a biscuit novice, these pointers will elevate your baking game.
- Use Cold Ingredients: Ensure your butter and buttermilk are cold. This helps create those coveted flaky layers in your biscuits.
- Don’t Overmix the Dough: Mix just until the ingredients come together. Overmixing can lead to tough biscuits.
- Proper Folding Technique: Folding the dough multiple times creates layers, resulting in a flakier texture.
- Use a Sharp Cutter: When cutting out your biscuits, use a sharp cutter and press straight down without twisting to help them rise evenly.
- Brush with Buttermilk: Brushing the tops with buttermilk before baking gives them a beautiful golden color.
By following these tips, you’ll achieve easy buttermilk biscuits that are both high in protein and full of flavor. Enjoy them fresh out of the oven for the best experience.
Storage Instructions
To keep your homemade buttermilk biscuits fresh and tasty, proper storage is key. Whether you’re saving leftovers or prepping in advance, these guidelines will help maintain their quality.
- Refrigeration: Store any leftover biscuits in an airtight container or tightly sealed with plastic wrap. Place them in the refrigerator promptly, preferably within two hours of baking.
- Freezing: For longer storage, wrap the biscuits individually in plastic wrap and place them in a freezer-safe bag. They can be frozen for up to 3 months.
- Reheating: To reheat, thaw frozen biscuits at room temperature and warm them in the oven at 350°F for about 10 minutes or until heated through.
By following these storage instructions, you can enjoy your easy buttermilk biscuits at their best, even days after baking.
More Buttermilk Biscuit Recipes
If you’re as obsessed with biscuits as I am, you’re in for a treat. I’ve got a few more high protein, flavor-packed biscuit recipes that are just as easy and satisfying as these homemade buttermilk biscuits.
Check out these other biscuit favorites on the blog:
- Homemade Buttermilk Strawberry Shortcakes
- Jalapeño Cheddar Biscuits
- High Protein Vegetarian Biscuits & Gravy
Whether you’re craving something sweet, savory, or a cozy breakfast classic, these biscuit recipes have you covered.
FAQs
Here are some frequently asked questions to help you perfect your high protein buttermilk biscuits:
-
Can I make these biscuits gluten-free?
Yes, you can substitute the all-purpose and keto wheat flours with a gluten-free flour blend. However, the texture may vary slightly, so it’s best to experiment to find the blend that works best for you.
-
What can I use instead of unflavored protein powder?
If you don’t have unflavored protein powder, you can use a flavored variety, keeping in mind it will alter the taste. Alternatively, you can omit it, but this will reduce the protein content of the biscuits.
-
How do I ensure my biscuits are flaky?
The key to flaky biscuits is using cold butter and not overworking the dough. Additionally, folding the dough multiple times before cutting helps create layers that result in flakiness.
-
Can I prepare the dough in advance?
Yes, you can prepare the dough, wrap it tightly, and refrigerate it for up to 24 hours before baking. This can help save time and even enhance the flavor.
If you have more questions or need further assistance, feel free to reach out or leave a comment on the recipe post!
Recipe Card

Homemade Buttermilk Biscuits
Ingredients
Buttermilk Biscuits:
- 90 g All Purpose Flour (King Arthur)
- 60 g Keto Wheat Flour or sub equal parts AP (King Arthur)
- 28 g Unflavored Protein Powder (Quest)
- 2 tsp Baking Powder
- ¼ tsp Baking Soda
- ½ tsp Salt
- 42 g Unsalted Butter (cold & cubed, Vital Farms)
- 56 g Nonfat Greek Yogurt (Siggi’s)
- 120 ml Low Fat Buttermilk (Sprout’s)
- 30 g All Purpose Flour (for kneading)

Instructions
Buttermilk Biscuits:
- Preheat the oven to 400°.
- In a larger bowl, add in your dry ingredients (1) and give a good mix.90 g (0.75 cups) All Purpose Flour, 60 g (0.5 cups) Keto Wheat Flour or sub equal parts AP, 2 tsp Baking Powder, 1/4 tsp Baking Soda, 1/2 tsp Salt, 28 g (0.25 cups) Unflavored Protein Powder
- Add in your cold cubed butter and press into the flour with your hands.42 g (3 tbsp) Unsalted Butter
- Then add in the yogurt and gently mix in with a spoon.56 g (0.25 cups) Nonfat Greek Yogurt
- Finally, add in the buttermilk to the center and mix a few times with your spoon until a shaggy dough forms. It will be crumbly but don’t over mix it.120 ml (0.5 cups) Low Fat Buttermilk
- Use your extra flour to flour your surface and pour out the dough.30 g (0.25 cups) All Purpose Flour
- Knead a few times until a solid dough forms. Use the extra flour to continuously flour the surface and your hands so it’s not sticky.
- Flour a rolling pin and roll the dough out into a rectangle. Fold one side to the center and then the other on top. Rotate the dough and roll out into a rectangle again.
- Repeat and fold in the edges. Repeat one last time. This will create more of those layers. Once a 1/2” – 3/4” thick shape, use a glass to cut out 8-9 circles.
- Add to a 10” cast iron or baking sheet. You can slightly overlap them or keep them spread out.
- Brush the tops with an extra tbsp of buttermilk.
- Bake for 15-18 minutes until golden brown on top.
- Let them cool for at least 10 minutes before slicing in half.
To Serve:
- Slice your biscuits in half and enjoy with jam, butter, or make into some strawberry shortcakes.
Video Tutorial
Nutrition Information
The Nutrition Facts above are specific to the ingredients I chose to use for this recipe.
Extra Notes & Tips
Save this recipe to your Pinterest Board and share it with your family and friends!

DID YOU MAKE THIS RECIPE?
Be sure to tag @tishasveggieeats on Instagram and hashtag #tishasveggieeats!


Leave a Reply