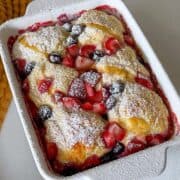
A Cheesecake All to Yourself
Say hello to the single-serve raspberry protein cheesecake of your dreams. Light, smooth, tangy, and packed with protein—this is the kind of dessert you’ll want to make on repeat. It’s got all the nostalgic raspberry cheesecake flavor but in a mini, no-sharing-required format that feels indulgent without overdoing it.

Each individual cheesecake is swirled with a quick microwave raspberry jelly that gives a sweet-tart punch in every bite. And the filling? A creamy trifecta of cottage cheese, Greek yogurt, and a touch of cream cheese—making it velvety soft with a surprising boost of protein. Honestly, it tastes like a classic cheesecake but with a lighter feel and more nutrients packed in.
These mini raspberry cheesecakes are baked until just set, then chilled for the perfect texture. Top them with whipped cream, fresh berries, or leave them as-is—either way, you’ve got yourself a low-calorie raspberry cheesecake that’s equal parts dreamy and satisfying.
So if you’ve been craving something summery and sweet, but also want to hit your protein goals, this raspberry low carb protein cheesecake is exactly what you need. Easy to make, easy to enjoy—and totally okay if you don’t want to share.
Macros Per Serving
219 Cal | 12g Carbs | 10g Fat | 21g Protein
- Macros Per Serving
- Why You’ll Love This Recipe
- Key Ingredients for this Single-Serve Raspberry Protein Cheesecake
- Substitution Options
- Equipment and Tools
- How to Make Your Single-Serve Raspberry Protein Cheesecake
- Chill and Serve
- Tips and Tricks
- Storage Instructions
- More Cheesecake Recipes
- Save this recipe to your Pinterest Board
- Recipe Card
- Save this recipe to your Pinterest Board and share it with your family and friends!
- Macros Per Serving
- Why You’ll Love This Recipe
- Key Ingredients for this —
- Substitution Options
- Equipment and Tools
- How to Make Your —
- Tips and Tricks
- Storage Instructions
- More — Recipes
- FAQs
- Recipe Card
- Save this recipe to your Pinterest Board
Why You’ll Love This Recipe
If you’re all about low-effort, high-reward desserts that taste amazing and secretly support your health goals, this one checks every box. Here’s why this single-serve raspberry protein cheesecake is worth making immediately:
- Perfectly Portioned: No need to slice or share—this individual raspberry cheesecake is made for one and satisfies that dessert craving without going overboard.
- High in Protein: Thanks to a blend of cottage cheese, Greek yogurt, and cream cheese, each mini cheesecake is packed with protein while still tasting like a treat.
- Low-Calorie and Light: This low-calorie raspberry cheesecake feels indulgent but fits perfectly into a balanced lifestyle.
- Quick Raspberry Jelly Swirl: A simple microwave jelly adds that bright, fruity raspberry flavor with minimal effort.
- Velvety Smooth Texture: The protein-packed filling bakes up creamy and smooth, just like traditional cheesecake—no cracks, no fuss.
- Make-Ahead Friendly: Bake, chill, and enjoy whenever you’re ready. It’s an ideal dessert for warm weather or post-dinner cravings.
Whether you’re looking for a low carb raspberry protein cheesecake to enjoy solo or a healthier twist on a classic dessert, this recipe delivers big flavor in a cute, compact form.

Key Ingredients for this Single-Serve Raspberry Protein Cheesecake
To bring this dreamy single-serve raspberry protein cheesecake to life, you only need a handful of nourishing, flavorful ingredients. Each component plays a key role in creating that velvety smooth texture, tangy-sweet balance, and high-protein boost. Here’s a breakdown of what makes this low-calorie raspberry cheesecake so special:
- Cottage Cheese: The not-so-secret star of the show. Cottage cheese brings creaminess, a subtle tang, and a big hit of protein. Blended smooth, it forms the base of our protein-packed filling.
- Lemon Juice: Just a touch from a wedge of lemon helps brighten up the flavor of the cheesecake while also enhancing the tartness of the raspberry layer.
- Neufchâtel Cream Cheese: A slightly lighter version of classic cream cheese, this adds richness and smoothness to the cheesecake batter without weighing it down.
- Greek Yogurt: High in protein and ultra-creamy, Greek yogurt helps lighten up the filling while keeping that traditional cheesecake texture intact.
- Egg: Acts as the binder that holds everything together once baked, giving your mini raspberry cheesecake its structure and silky texture.
- Vanilla Protein Powder: This boosts the protein content while adding a subtle vanilla sweetness that complements both the cheesecake and raspberry swirl.
- Lemon Instant Pudding Mix: A little unexpected, but this is the secret to an extra thick, creamy filling with a hint of citrus flavor that brightens everything up.
- Raspberries: Juicy, sweet-tart, and perfect for making a simple, fresh raspberry jelly to swirl through your mini cheesecakes.
- Cornstarch or Tapioca Flour: Helps thicken the raspberry jelly to just the right consistency, creating that signature swirl throughout each low carb raspberry protein cheesecake.
- Lemon Zest: Adds an aromatic brightness to the jelly that makes every bite pop.
Substitution Options
This recipe is flexible and can be customized to fit your dietary needs, taste preferences, or what you already have in the kitchen. Here are a few easy swaps you can try without sacrificing the deliciousness of this single-serve raspberry protein cheesecake:
- Cottage Cheese: If you’re out of cottage cheese or prefer a different texture, try using ricotta cheese instead. It will still give a creamy finish with a mild flavor.
- Neufchâtel Cream Cheese: Feel free to use standard cream cheese if you’re not concerned about fat content, or a dairy-free version if needed.
- Greek Yogurt: Swap with any high-protein yogurt you love, whether it’s plant-based or flavored (vanilla works well here).
- Vanilla Protein Powder: You can try a different flavor like lemon or berry if you want to experiment, or omit it entirely and add a bit more pudding mix for thickness (though protein will be lower).
- Lemon Instant Pudding Mix: Vanilla or white chocolate pudding mix also works well and will still keep the low-calorie raspberry cheesecake rich and thick.
- Raspberries: Feel free to substitute with strawberries, blackberries, or even a berry medley if raspberries aren’t in season.
Mix and match based on what you have—and don’t be afraid to get creative with your low carb raspberry protein cheesecake!
**If there is a sub I haven’t mentioned above, it’s because I have not tested it and can’t speak for how well it would work for this recipe.
Equipment and Tools
You won’t need any special baking equipment to whip up this low-calorie raspberry cheesecake—just a few kitchen basics to get the job done smoothly. These tools will help you achieve that creamy texture, beautiful swirl, and perfect single-serve size.
- Measuring Scale: Precision matters for this recipe, especially when working with higher-protein ingredients that affect texture.
- Mini 4” Springform Pans: Essential for creating perfectly shaped, single-serve raspberry cheesecakes that release cleanly after baking.
- Countertop Blender: Helps fully smooth out the cottage cheese mixture so there are no lumps in the final cheesecake batter.
- Hand Mixer: Ensures everything blends together smoothly for that velvety cheesecake consistency.
- Microwave-Safe Bowl: Used to quickly cook down the raspberries and create that simple homemade jelly.
- Toothpick or Skewer: For swirling the raspberry jelly into the cheesecake layers with that marbled finish.
- Oven: A standard or toaster oven works great for baking these mini cheesecakes.
- Baking Tray: Makes transferring the mini pans into and out of the oven much easier and helps catch any spills.
These tools make it easy to bring your raspberry low carb protein cheesecake to life without a ton of effort or clean-up.
How to Make Your Single-Serve Raspberry Protein Cheesecake
This high-protein dessert is easier to make than you might think—and most of the work is just blending, swirling, and baking. You’ll have a raspberry cheesecake that looks fancy but takes very little hands-on time.

Blend Your Cottage Cheese
Start by blending the cottage cheese with lemon juice and a splash of water. You want it smooth but not runny, so add the water a little at a time until the texture is just right.
Mix the Cheesecake Filling
In a mixing bowl, add your blended cottage cheese, cream cheese, Greek yogurt, and egg. Use a hand mixer to blend everything together. Then add in the vanilla protein powder and lemon pudding mix, and mix again until your batter is smooth with minimal lumps. Set it aside.

Make the Raspberry Jelly
In a separate bowl, combine your raspberries, cornstarch (or tapioca flour), and a tablespoon of water. Mix it up, then microwave for 30 seconds. Mash with a fork and microwave for another 30 seconds until jelly-like. Stir in the lemon zest.
Assemble the Cheesecakes
In two mini 4” springform pans, add a layer of cheesecake batter followed by a layer of raspberry jelly. Swirl with a toothpick, then repeat the layers one more time. Swirl again to create that signature raspberry swirl.
Bake
Place the cheesecakes on a baking tray. If possible, add a small dish of water to the oven for steam. Bake at 325°F for 20–25 minutes until just set in the center.

Chill and Serve
Let the mini raspberry cheesecakes cool completely, then chill for at least 2 hours. Top with whipped cream and fresh raspberries if you’d like—or just dig in as is!
This single-serve raspberry protein cheesecake is the perfect make-ahead dessert. Keep them chilled and enjoy throughout the week!
Tips and Tricks
Here are some valuable tips and tricks to make your single-serve raspberry protein cheesecake turn out smooth, creamy, and perfectly swirled every time. From ingredient prep to baking tips, these little adjustments can make a big difference in your final result.
- Blend the Cottage Cheese Well: Make sure your cottage cheese is fully blended with no lumps before adding it to the batter. This ensures a silky smooth texture for your raspberry low carb protein cheesecake.
- Use Room Temperature Ingredients: Allow your cream cheese, Greek yogurt, and egg to come to room temperature before mixing. This helps everything blend more easily and prevents overmixing.
- Microwave in Intervals: When making the raspberry jelly, microwave in short bursts and mash in between to avoid overcooking or burning. You want a thick, jam-like texture that swirls beautifully.
- Swirl with a Toothpick: For that signature raspberry cheesecake swirl, use a toothpick or skewer to gently drag the raspberry jelly through the cheesecake layers. Don’t overdo it—you still want to see those vibrant ribbons.
- Use a Water Bath: Placing a small dish of water in the oven while baking helps add moisture and prevents cracking. It’s a simple way to get that smooth, bakery-style finish.
- Chill Before Serving: Let the cheesecakes cool fully and chill for at least 2 hours before slicing or removing from the pan. This gives your mini raspberry cheesecake time to set properly.
Even though this recipe is simple, following these little tricks will help you achieve the best possible texture and flavor—every single time.
Storage Instructions
Here are some storage instructions to ensure your single-serve raspberry protein cheesecake stays fresh, creamy, and delicious even after it’s been chilled.
- Refrigeration: Store your mini raspberry cheesecakes in an airtight container in the fridge. Let them cool fully at room temperature first before refrigerating to avoid condensation.
- Keep Toppings Separate: If you plan to add whipped cream or extra raspberries, store those separately and add them just before serving. This keeps the texture and flavor of each layer intact.
- Best Eaten Within 3–4 Days: These low-calorie raspberry cheesecakes are best enjoyed within a few days of baking. The texture holds up beautifully for up to 4 days when properly stored.
- Avoid Freezing: Due to the high protein and dairy content, freezing is not recommended. It may cause the texture of your raspberry protein cheesecake to become grainy or split.
- Chill Before Slicing: Always chill the cheesecake completely before trying to slice or serve. This ensures clean wedges and that velvety smooth finish in every bite.
By following these simple storage tips, your raspberry low carb protein cheesecake will taste just as amazing on day three as it did fresh out of the oven.

More Cheesecake Recipes
If you loved this single-serve raspberry protein cheesecake, I’ve got more high-protein, healthy dessert options that bring all the indulgence with none of the guilt. Here are a few more cheesecake-inspired recipes you’ll definitely want to try:
- Burnt Basque Lemon Curd Cheesecake
- High Protein Strawberry Cheesecake
- Low Calorie Biscoff Cheesecake
FAQs
If you’re making this for the first time, you might have a few questions—and I’ve got answers! Here are the most common questions I get about this single-serve raspberry protein cheesecake.
-
Can I make this raspberry protein cheesecake without a springform pan?
Yes, you can use a ramekin or any small oven-safe dish, though a springform pan will give you the cleanest results. Just make sure to line or grease the dish well so the cheesecake doesn’t stick.
-
Can I use frozen raspberries instead of fresh?
Absolutely! Frozen raspberries work just as well—just thaw them first and drain any excess liquid. Then follow the same instructions for the jelly swirl.
-
How do I know when the cheesecakes are done baking?
They’re ready when the edges look set but the center still has a slight jiggle. Overbaking can cause cracks and dryness, so keep an eye on them during the last 5 minutes.
-
What can I use instead of lemon pudding mix?
If you don’t have lemon pudding mix, vanilla works great too! It still adds that thick, creamy texture while complementing the raspberry flavor beautifully.
Recipe Card
Single-Serve Raspberry Protein Cheesecake
Ingredients
Cheesecake:
- 55 g Cottage Cheese (Good Culture)
- ¼ Lemon Wedge
- 57 g Reduced Fat Neufchâtel Cream Cheese (room temperature (Philadelphia))
- 113 0 % Milkfat Greek Yogurt (Fage)
- 1 Large Brown Egg (Vital Farms)
- 15 g Vanilla Protein Powder (Quest)
- 6 g Lemon Instant Pudding Mix (Simply Desserts)
Raspberry Jelly:
- 85 g Raspberries
- 3 g Cornstarch or Tapioca Flour (Bob’s Red Mill)
- ½ tsp Lemon Zest
Instructions
Cheesecake:
- Start off by blending together your cottage cheese and lemon juice with about a tbsp of water. You want the lumps gone and for it to be a smooth consistency but not runny either. Continue to blend until it gets to that consistency and add water as needed.55 g (0.25 cups) Cottage Cheese, 1/4 Lemon Wedge
- Then in a bowl add in the blended cottage cheese, cream cheese, Greek yogurt, and egg. Use a hand mixture to blend it all together.57 g (2 oz) Reduced Fat Neufchâtel Cream Cheese, 113 0 (0.5 cups) % Milkfat Greek Yogurt, 1 Large Brown Egg
- Add in the protein powder and pudding mix and mix again until you have a smooth batter with minimal lumps. Set aside.15 g (1 tbsp) Vanilla Protein Powder, 6 g (1.5 tsp) Lemon Instant Pudding Mix
Raspberry Jelly:
- In a bowl, add your raspberries and tapioca flour with a tbsp of water. Give it a quick mix and then microwave for about 30 seconds. Use a fork to mash it up and microwave again for 30 seconds. You should have a nice jelly like consistency. Add lemon zest and mix again.85 g (0.75 cups) Raspberries, 3 g (1 tsp) Cornstarch or Tapioca Flour, 1/2 tsp Lemon Zest
Assemble:
- In your mini 4” springform pan, add a quarter of the cheesecake mixture and flatten it out. Then add a quarter of the raspberries and use a toothpick to swirl it into the cheesecake. Repeat with a second layer of cheesecake and raspberry jelly. Repeat the same for your second mini cheesecake.
- If possible, add a small baking dish full of water in your oven along with the cheesecakes. This will help with cracking and create steam and moisture. Bake at 325° for 20-25 minutes.
- Let them chill for at least 2 hours before removing from the pans and cutting into wedges.
- Top with whipped cream if desired and enjoy!
Video Tutorial
Nutrition Information
The Nutrition Facts above are specific to the ingredients I chose to use for this recipe.
Save this recipe to your Pinterest Board and share it with your family and friends!

DID YOU MAKE THIS RECIPE?
Be sure to tag @tishasveggieeats on Instagram and hashtag #tishasveggieeats!


Leave a Reply