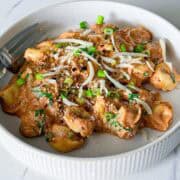
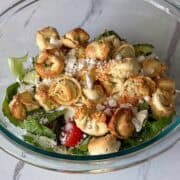
Cheesy, Garlicky, Doughy Bliss
You’ve never had garlic bread like this before. These cheese stuffed garlic dough balls are pillowy soft on the outside, filled with gooey cheesy goodness on the inside, and brushed with golden garlic butter the moment they come out of the air fryer. Each bite is warm, melty, and incredibly satisfying. And the best part? They’re secretly packed with protein and lower in calories than your typical cheesy snack.

Made with my go-to Greek yogurt dough, these healthier cheesy garlic dough balls come together in minutes. The dough is soft, stretchy, and protein-rich—no yeast or rise time needed. Each one gets stuffed with fat-free mozzarella, sealed, and air fried until perfectly puffed and golden brown.
If you’re looking for the ultimate high protein low calorie cheesy garlic bread situation, this is it. They make the perfect late night bite, appetizer for guests, or carb-loaded side to your main dish. No judgment if you end up eating the whole batch solo—each dough ball has 16g of protein, so you’ll be full and happy either way.
Think of them as your new favorite upgrade to traditional garlic knots or cheese bread. Crisp on the outside, melty on the inside, and absolutely addictive. Whether you’re craving something cozy or need a crowd-pleaser, these protein garlic bread stuffed with cheese balls always deliver.
Macros Per Serving
167 Cal | 20g Carbs | 2g Fat | 16g Protein
- Macros Per Serving
- Why You’ll Love This Recipe
- Key Ingredients for these Cheese Stuffed Garlic Dough Balls
- Substitution Options
- Equipment and Tools
- How to Make Your Cheese Stuffed Garlic Dough Balls
- Tips and Tricks
- Storage Instructions
- More Cheesy Pizza Recipes
- FAQs
- Save this recipe to your Pinterest Board
- Save this recipe to your Pinterest Board and share it with your family and friends!
- Macros Per Serving
- Why You’ll Love This Recipe
- Key Ingredients for this —
- Substitution Options
- Equipment and Tools
- How to Make Your —
- Tips and Tricks
- Storage Instructions
- More — Recipes
- FAQs
- Recipe Card
- Save this recipe to your Pinterest Board
Why You’ll Love This Recipe
Looking for a snack that hits the spot and fits your goals? These high protein low calorie cheesy garlic bread bites check all the boxes. Packed with flavor and nutrients, they’re easy to make, fun to eat, and hard not to love.
Whether you’re making them for yourself or serving them up as a side, these low calorie cheese stuffed dough balls are a total win. Here’s why they’ll quickly become a go-to:
- Quick & Fuss-Free: With no yeast or long rise time, this dough comes together in minutes and air fries fast.
- Protein Packed: Thanks to Greek yogurt and fat-free mozzarella, each cheesy dough ball clocks in with 16g of protein.
- Lower Calorie Swap: A lighter take on classic garlic bread or cheese rolls, so you can indulge without going overboard.
- Perfect Texture Combo: Crisp and golden on the outside, soft and gooey in the center.
- Garlic Butter Finish: Brushing them with garlic butter post-air fry takes the flavor over the top.
- Great Anytime Option: Serve as a snack, pair with pasta, or stash some for when late-night cravings hit.
These are the healthier cheesy garlic dough balls you’ll want to make on repeat. Cozy, flavorful, and secretly nutritious—what more could you ask for?

Key Ingredients for these Cheese Stuffed Garlic Dough Balls
These cheese stuffed garlic dough balls may look indulgent, but they’re actually made with better-for-you ingredients that keep things light without skimping on flavor. From the protein-packed dough to the melty cheese center and garlicky finish, every component plays a delicious role.
Here’s a closer look at what goes into these healthier cheesy garlic dough balls:
- Self-Rising Flour: This flour does the heavy lifting—literally. It gives the dough its rise and fluffiness without needing yeast, keeping things quick and easy.
- Unflavored Protein Powder: The secret to turning your garlic bread into a high protein low calorie cheesy garlic bread dream. It adds a protein boost without affecting the flavor.
- Garlic Powder: A dash of garlic powder is mixed right into the dough to double down on that savory, garlicky flavor we all love.
- Salt: Just a pinch enhances the flavor of the dough and helps balance the cheesy filling and garlic butter topping.
- Nonfat Greek Yogurt: This is what makes the dough soft and tender while also packing in protein. It’s a key player for creating a pillowy texture.
- Fat-Free Mozzarella Cheese: The ultimate gooey center. This lower-calorie cheese melts beautifully and brings all the cheesy pull you’d expect from the best protein garlic bread stuffed with cheese.
- Unsalted Butter: Used for brushing the tops, this melted butter adds richness while keeping control over the sodium content.
- Garlic: Fresh minced garlic mixes with the butter to create that iconic garlic bread flavor everyone craves.
- Italian Seasoning: Adds a herbaceous boost that complements the garlic butter and cheese perfectly.
- Fat-Free Marinara Sauce: While optional, this dipping sauce takes these low calorie cheese stuffed dough balls to the next level.
Substitution Options
Not working with everything on the ingredient list? Don’t worry—there are plenty of ways to tweak these cheese stuffed garlic dough balls while keeping them just as tasty and satisfying.
These swaps let you customize based on what you have on hand, your preferences, or dietary needs—while still ending up with a delicious batch of healthier cheesy garlic dough balls:
- Self-Rising Flour: You can make your own by combining all-purpose flour with baking powder and salt. Or use a whole wheat version for added fiber. To replace 70g self-rising flour, use 70g all-purpose flour with ¾ tsp baking powder and a pinch of salt.
- Protein Powder: If you don’t have unflavored protein powder, use more self-rising flour, though you’ll lose some protein content.
- Greek Yogurt: Any thick nonfat or low-fat yogurt can be used. Just make sure it’s not too watery, or your dough may turn out sticky.
- Fat-Free Mozzarella: Swap with part-skim mozzarella, dairy-free mozzarella, or your favorite melty cheese. Just keep in mind the protein and calorie counts may change.
- Butter: Feel free to use a plant-based butter alternative or even olive oil for a slightly different garlic glaze.
- Garlic & Herbs: If you don’t have Italian seasoning, a mix of dried oregano, parsley, and basil works just as well.
- Marinara Sauce: No marinara? Serve with pizza sauce, pesto, or a spicy tomato dip to keep things fun and flavorful.
Play around with what you’ve got—these high protein low calorie cheesy garlic bread bites are super forgiving and customizable!
**If there is a sub I haven’t mentioned above, it’s because I have not tested it and can’t speak for how well it would work for this recipe.
Equipment and Tools
No need to pull out your stand mixer or anything fancy—this high protein low calorie cheesy garlic bread recipe keeps things simple. All you need are a few basic tools you likely already have in your kitchen.
Each piece of equipment is essential for making these dough balls fluffy, cheesy, and golden brown. Here’s what you’ll need:
- Mixing Bowl: Perfect for combining your dry and wet ingredients and bringing your Greek yogurt dough to life.
- Measuring Scale: For accurate measurements and consistent results—especially important for the dough-to-filling ratio.
- Measuring Spoons and Cups: To get the right amounts of flour, garlic, and seasoning.
- Spatula or Spoon: For mixing your ingredients together before kneading.
- Clean Counter or Board: You’ll need a lightly floured surface to knead and shape your dough.
- Baking Sheet: Essential for baking the dough balls until golden brown. A parchment-lined sheet prevents sticking.
- Pastry Brush: To coat the dough balls with that glorious garlic butter right out of the oven.
- Small Bowl: For mixing the butter, garlic, and seasoning.
- Air Fryer or Conventional Oven: Either method works great for baking these cheese stuffed garlic dough balls until golden brown and puffed. Use what you have—both deliver delicious results.
These tools make it easy to whip up a batch of low calorie cheese stuffed dough balls anytime a craving strikes. Whether you’re using an air fryer or a conventional oven, both will give you that perfectly golden, melty result. Choose whichever works best for your setup and snack away!
How to Make Your Cheese Stuffed Garlic Dough Balls
This easy snack or side comes together in a flash—minimal prep, no fancy techniques, and maximum satisfaction. These cheese stuffed garlic dough balls are a dream combo of fluffy, gooey, and garlicky, all while being secretly high in protein.
Start by preheating your oven to 375°F and grabbing your ingredients. You’ll be enjoying these pillowy bites in no time!

Make the Dough
In a mixing bowl, combine your flour, protein powder, garlic powder, salt, and Greek yogurt. Mix until a shaggy dough forms. Transfer the dough to a lightly floured surface and knead until smooth and uniform.
Form the Dough Balls
Divide the dough into three equal sections and roll each into a ball. Flatten each one gently and add a portion of mozzarella cheese to the center. Carefully fold the edges over the filling and pinch to seal the dough into a stuffed ball.

Bake
Place your dough balls on a parchment-lined baking sheet and bake for 8–10 minutes until golden brown and puffed up.
Garlic Butter Finish
While they bake, melt your butter and mix it with the minced garlic and Italian seasoning. Once the dough balls are done, immediately brush the tops with the garlic butter.

Serve and Enjoy
Dip into warm marinara and enjoy the melty, cheesy goodness. These protein garlic bread stuffed with cheese bites are best served fresh, but you can reheat them later for another round of indulgence.
Tips and Tricks
Here are some handy suggestions to help you nail your cheese stuffed garlic dough balls every time while keeping them high in protein and low in calories. These tricks will keep your dough fluffy, cheesy center melty, and garlic flavor just right.
- Use Thick Greek Yogurt: Choose a creamy, thick nonfat Greek yogurt for the dough. It helps the dough stay moist and protein-rich—crucial for these healthier cheesy garlic dough balls.
- Keep Protein Powder Dry: Lightly mix the unflavored protein powder into your dough ingredients. Too much moisture can make the dough sticky, so handling it gently keeps the texture perfect.
- Seal the Cheese Well: To avoid leaks during baking, pinch dough edges tightly around the mozzarella. A secure seal ensures your protein garlic bread stuffed with cheese comes out with gooey interiors.
- Don’t Over-Bake: Aim for just golden brown—overbaking can dry out these low calorie cheese stuffed dough balls. They bake quickly, so keep an eye on them around the 8‑minute mark.
- Brush Immediately: After baking, brush with garlic butter while still warm. That step elevates the flavor in these healthier cheesy garlic dough balls so they stay savory and melty.
- Reheat Wisely: For leftovers, reheat in a toaster oven or air fryer briefly to crisp the exterior without compromising the cheesy center.
- Double the Batch: These high protein low calorie cheesy garlic bread bites freeze well—make extra to store for later and satisfy cravings with minimal effort.
With these tips, your garlic bread dreams get upgraded into protein-packed reality. These low calorie cheese stuffed dough balls become even easier and more foolproof with practice.
Storage Instructions
Here’s how to store your cheese stuffed garlic dough balls so they stay fresh, protein-packed, and just as tasty when you’re ready to enjoy them again.
- Refrigerations: After they cool, place any leftover dough balls in an airtight container. Store them in the fridge within two hours of baking for safety and texture preservation.
- Separate Sauce if Possible: If serving with marinara, store sauce separately so your cheese stuffed garlic dough balls stay crisp and avoid sogginess.
- Reheat Properly: To maintain that satisfying golden exterior and gooey center, reheat in a toaster oven or air fryer at low heat, rather than using a microwave.
Even after a day or two, these protein garlic bread stuffed with cheese bites stay flavorful and satisfying. With proper storage and reheating, they’ll feel freshly baked each time you enjoy them.

More Cheesy Pizza Recipes
I’m always craving cheesy, protein‑rich bites—especially when they’re low calorie and full of flavor. Here are some recipe gems from Tisha’s Veggie Eats that should be on your radar if you’re loving these cheese stuffed garlic dough balls:
- Garlic and Cheese Stuffed Focaccia Bread
- Stuffed Crust Margherita Pizza
- Spinach and Artichoke Stuffed Spanakopita Triangles
FAQs
Here are answers to some common questions about making these cheese stuffed garlic dough balls:
-
Can I make them without protein powder?
Yes—simply omit the unflavored protein powder and add a bit more self-rising flour. While you’ll lose some protein per serving, the dough will still be soft and flavorful, and the end result remains satisfying.
-
Are these freezer-friendly?
Absolutely! Freeze baked dough balls in a sealed container or freezer bag. When you’re ready to enjoy, reheat them straight from frozen in an air fryer or oven until warmed through and crisp.
-
What other cheeses can I use?
Fat-free mozzarella is the original pick, but part-skim mozzarella, plant-based cheese, or even sharp cheddar works beautifully—just keep in mind protein and calorie changes with swaps.
-
Can I air-fry these instead of baking?
Yes! Air frying at around 375°F for 6–8 minutes works well too. It results in slightly crispier exteriors while keeping the interiors soft and melty—just watch them closely toward the end.
These tips should help your gooey, protein-packed garlic bread dreams become an everyday habit!
Recipe Card
Cheese Stuffed Garlic Dough Balls
Ingredients
Dough:
- 70 g Self Rising Flour (King Arthur)
- 14 g Unflavored Protein Powder (Quest Baking)
- ½ tsp Garlic Powder
- Pinch of Salt
- 113 g Nonfat Greek Yogurt (Siggi’s)
- 56 g Fat Free Mozzarella Cheese (H-E-B)
Garlic Butter:
- 7 g Unsalted Butter (melted (Vital Farms))
- 1 tsp Garlic (minced)
- Italian Seasoning
Serve with (not counted in macros):
- Fat Free Marinara Sauce (Whole Foods)
Instructions
- Preheat oven to 375°.
Dough:
- In a bowl, mix together your dough ingredients (excluding cheese). Transfer to a floured surface and knead until fully formed.70 g (0.5 cups) Self Rising Flour, 14 g (1 tbsp) Unflavored Protein Powder, 1/2 tsp Garlic Powder, Pinch of Salt, 113 g (0.5 cups) Nonfat Greek Yogurt
- Cut into three equal sections and roll them into balls. Flatten out each and fill the middle with 1/3rd of your cheese. Fold over the edges and pinch together to create an enclosed ball. Repeat for the other 2.56 g (0.5 cups) Fat Free Mozzarella Cheese
- Add to a parchment lined baking sheet and bake for 8-10 minutes until golden brown.
Garlic Butter:
- In a small bowl, melt your butter and mix with garlic and Italian seasoning.7 g (0.5 tbsp) Unsalted Butter, 1 tsp Garlic, Italian Seasoning
- Brush the tops of your balls with the garlic butter and then dip into some marinara sauce to enjoy!Fat Free Marinara Sauce
Nutrition Information
The Nutrition Facts above are specific to the ingredients I chose to use for this recipe.
Save this recipe to your Pinterest Board and share it with your family and friends!

DID YOU MAKE THIS RECIPE?
Be sure to tag @tishasveggieeats on Instagram and hashtag #tishasveggieeats!


Leave a Reply